With the sides all cut and prepped and the joinery cut and sized for the the legs and all four sides of the chest it was time for a day of doing the little jobs that would help stage up the next sections of the build.
I started the day working on the Celtic knot medallion carving in the center of the front panel. This past year of electron free living probably made one of the biggest changes in my carving habits. I have done a lot of carving, not super detailed and intricate designs and definitely not relief carving, so far I have stuck with simple line representations. Simple and easy, I think anyone can do it. I have used a Dremel type rotary tool with a variety of specialty burrs I have collected over the years. They did the job well but I was never satisfied with a couple of the side effects. One was the dust they created. I would walk out of the shop after doing an afternoon of carving and have a good coating of it all over my arms and clothes and even in my beard. Not good and definitely not healthy to be breathing all that dust. The other problem was the vibration of the motor in my hand, I never managed to pick up one of those flexible extension collets that I have seen a lot of other power carvers use, and the weight and vibration would have my hand cramping by the end of the afternoon.
I picked up a couple of hand carving chisels at the Woodcraft store in Madison several months back and I have been smitten ever since. I just spent a little while watching a master like Peter Follansbee use them in some internet videos and an episode of The Woodwrights Shop and picked up a couple of techniques and using them seemed very intuitive after that. I dont doubt I have much more to learn an thats why Im excited to hear about Lie Nielsen putting out a instructional video with Peter (a link to the preview on YouTube HERE). I consider the chisels an upgrade, no more ear plugs, no more dust, in my opinion easier to control, just the tap tap of the mallet. I may never power carve again.
I started with a printout of a Celtic knot design I admit I used from a design book I purchased at Barnes & Nobles a couple years ago. The book was full of royalty free patterns (under certain rules), and its been a real resource for me in these instances. The first step was to use a couple push pins to secure the print out over a piece of carbon paper, making sure I got it centered in the board.


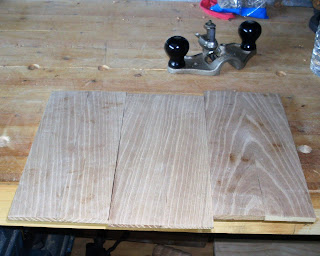
The trouble was I wanted them 5" wide, let me explain the week here in Wisconsin while I was working on this, one of the hottest on record with heat indexes into the upper 90s (I know thats almost nothing if you live down south, but it was a very muggy and draining heat up here) and the new workshop version 5.0 is a steel shed, otherwise known as an oven, or a hot box (Cool Hand Luke anyone?) I decided early on I was not doing this resaw by hand, but the issue was the size of my bandsaw. Its a small and cheep 9" off brand. Something I picked up cheep so I could get the feel for a bandsaw before I put big money into one. The resaw capacity on this is like 3 and 3/4", maybe a 2x4. So I sat down and thought about it for a while.
I decided that instead of a problem this was an opportunity. If I resawed 2 1/2" boards in half and book matched them when I joined them back together it could be a subtle but stunning touch. So I managed to do just that. and with the end results I am happy I did.


Cheers
Oldwolf


0 komentar:
Posting Komentar