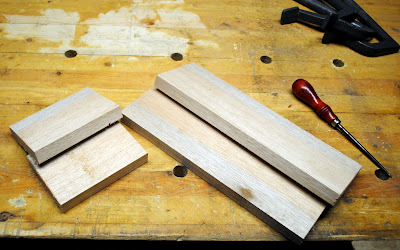
I needed a small box to hold my auger bits for my braces. I had a little mahogany laying about and figured, a little upscale for auger bits but what the hell its not doing me any good over here on the cut off pile. As I was cutting the dovetail joints I started to think about how I had heard that mahogany carves like butter so I figured, hey why not, a great chance to practice some of my 17th century carving techniques I picked up from Peter Follansbees DVD. A couple minutes on the net and I had a couple patterns I hadnt tried yet and I went to town.
The cool thing about this is I got this project started and finished in just one day in the shop, it was a good long enjoyable day, but it was one day, and that makes me smile. At any rate I thought that from here on out I would stop typing and just let the pictures tell the tale of the day.


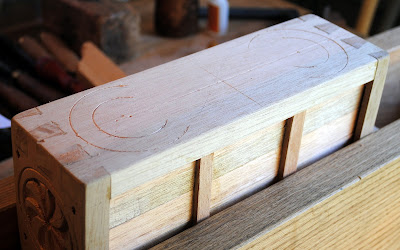

 In some pictures you get a good look at the contrast in the wood between sap wood and heart wood, I oriented the stock when I was putting it together to make sure the darker band chased itself around the bottom of the box. A Danish Oil finish and I called it good. I do have to give a little shout out over to the Badger Woodworks Blog because it was his practice carving of a similar vein that inspired me to give the "S" scroll a try on the backside. I have to admit, his turned out better than mine, I ended up trying to stretch it too much for my proportion tastes.Overall a very satisfying project.
Heres a few final pictures:


 I really begin to dig that heart wood, sap wood contrast. I made a good choice orienting the darker along the bottom, I think it gives this small box a little bit of gravity and weight.
Ratione et Passionis
Oldwolf
Read More..
The cool thing about this is I got this project started and finished in just one day in the shop, it was a good long enjoyable day, but it was one day, and that makes me smile. At any rate I thought that from here on out I would stop typing and just let the pictures tell the tale of the day.
Heres a few final pictures:
Ratione et Passionis
Oldwolf
Leons Tea Box Part 2 Completion of the outer lid
Hi Everyone,
Ok, Im back.
Here is the box with the lid on the lathe. Im getting ready to finish the top of the lid:
 Now Ive taken away the tailstock and Im going to turn the top. I have the beginning of a knob on the top. This is an important step as the box doesnt have a lot of detail so the lid is the only area that will have some detail to it. I wanted to give the box a Japanese-like formality so there isnt a lot of detail. Instead the box will stand on its shape, the shape of the lid, and the figure in the wood itself:
 Here is the lid several minutes later:
 And here is the completed lid. It has been sanded and smoothed and its ready for a finish:
 These next two photos show the lid by itself:

 The tea box is about 3/4 finished at this point.
Lets go to the next posting and youll see how it came out.
VW
Read More..


Ok, Im back.
Here is the box with the lid on the lathe. Im getting ready to finish the top of the lid:
Now Ive taken away the tailstock and Im going to turn the top. I have the beginning of a knob on the top. This is an important step as the box doesnt have a lot of detail so the lid is the only area that will have some detail to it. I wanted to give the box a Japanese-like formality so there isnt a lot of detail. Instead the box will stand on its shape, the shape of the lid, and the figure in the wood itself:Here is the lid several minutes later:And here is the completed lid. It has been sanded and smoothed and its ready for a finish:These next two photos show the lid by itself:The tea box is about 3/4 finished at this point.Lets go to the next posting and youll see how it came out.
VW
Priscillas Bowl Hollowing out the bowl
Hi Everyone,
Well the temperature is rising and the snow is melting fast and so this is a good day to go out and work on the bowl some more. Heres todays photos:
I began hollowing out the bowl yesterday and I probably cut away about half the inside of the blank. My goal today was to finish hollowing it out and hollowing a bowl presents a number of challenges. People place things inside of bowls so the volume of the bowl is one concern. Another is the thickness of the walls and the bottom-you want to wind up with a sturdy bowl that wont break if its dropped but doesnt look clunky. And the inside needs to approximately match the outside in terms of the shapes matching up.
Here is the first photo. Ive deepened the floor of the bowl and Ive begun creating the sides of the bowl. Note the position of the tool rest-it needs to sit inside of the bowl and as close to the surface as possible. This allows me to get the tip of the turning chisel into the wood without causing a lot of vibration in the tool:
 Here is the bowl several minutes later. Its deeper and the sides are beginning to shape up. Note the raised section in the center. I like to leave cutting the center until well into the turning. It gives me a visual cue as to how much wood Ive removed without having to stop and measure the depth:
 One of the problems that turners encounter when making a bowl is vibration, particularly at the rim. This can lead to the tip of the chisel skipping across the surface of the wood as it spins. I like to keep the sides and bottom a uniform thickness as I turn. That really helps to counter that.
Here is a photo of the rim. I want to have the rim and the width of the ribbon match up. I think this will look good and Im just about there in the photograph:
 At this point I put the camera down and finished hollowing the bowl out. Another concern, and this happens with every project, is to know when its time to stop cutting something. Dont cut enough and you wind up with essentially an unfinished bowl. Cut too much and risk cutting through the bottom or ruining the design. How thin to make the walls and how thick to leave the bottom are also questions to be answered.
I elected to leave the walls about 1/2" thick and the bottom about 1" thick. This last measurement includes the foot of the bowl. I think these are good measurements to stop with and I dont mine leaving this bowl, or any bowl for that matter, a little bottom heavy. It keeps the bowl from easily tipping over.
Here are the last two photos for this session:

 The bowl at this points seems a little heavy to me so Im going to stop and sleep on it and return to the bowl tomorrow.
See you Thursday,
VW
Read More..
 It is done.
And better yet, it saws wonderfully. The old girl looks pretty good for being around a hundred years old. It took me a while to run the last leg of this race but yesterday I got my act together and finished the rehab.
What took so long was my wait for a couple parts I used a local metalsmith to fabricate. The stock guides are L shaped braces that I wouldnt call vital, but they are damn handy. They sit in shallow dados in the bed and clamp into place with a thumb screw clamp behind the fence.
 When you place the stock on the bed, you snug up the stock guide to support the piece in place against the back and forth friction of the saw stroke.
 Yes you could hold the stock with your hand, but that may be more difficult when dealing with crown mouldings. They make using the saw much nicer.
I tried to fabricate these by myself couple of different ways. I bought the flat and round steel stock and first I tried to drill and tap the end of the steel bar for a machine screw. I tried to be careful and take my time, I drilled the appropriate hole and used oil to lubricate the process. Yet my tap broke off inside the steel bar.
Crap.
So I went to plan B. I had read another online account of a similar rehab where the author fabricated his using a two part epoxy. I picked some up and gave it a shot. Again I followed the instructions carefully but I couldnt get the epoxy to hold up to even light handling. I was doubtful about it, but it was worth a shot.
One thing I dont have in my skill set that I would love to learn is welding. I cast around and found a local metal smith / artist who was willing to throw down a couple quick welds for me. After a few weeks I was able to stop and pick up the pieces.
Now I was in business. The only metal fabrication part I had left was a top bar that connects the two towers and keeps them from racking while youre sawing. This was a simple piece of flat stock, (the same as I used for the stock guides) and it took me re-taping and replacing one of the thumb screws with a replacement.
 A couple of screws connected the saw box to a off-cut of 1x12 pine. Now I can cinch it to the bench with a couple holdfasts and store it underneath when I dont need it.
 All that was left was to sharpen the saw itself. I always kind of work myself up about before hand and when its over I think, "Damn, that wasnt so bad." For certain its not that difficult of a thing to learn, and the more I do it the better Ive gotten.
One of the turning points for me was taking a saw sharpening class with Mark Harrell over at Bad Axe Tool Works. I wrote about that experience HERE. Working with Mark taught me to trust my the feel of the file and the things my eyes were seeing and has let me do away with the guide blocks and jigs Id been using up to this point. Knowing what to look for has improved my sharpening greatly. Hes teaching more of these classes. As I understand it a couple times a year. Drop by his site and get in contact with him about dates and details. Its so worth it.
 Once I sharpened the teeth I used another piece of pine off-cut to test my work. Another trick I learned from Mark. I scribe a square line and saw it, burying the saw to the back. If the saw follows the line, were good. If it appears to pull to one side or the other, a little sharpening stone on the toothline will adjust that.
This time things turned out just right. No stoning necessary.
 Now would be the moment of real truth. Would the miter box give me accurate cuts? or would more adjustments be required?
I grabbed a piece of cherry scrap and gave it a shot.
90 degree cut checked out perfect. No light creeping under the trisquare blade when it was checked.
Encouraging, but what about 45 degree miters.
 According to my miter square. Accurate as can be. Im a happy boy!
There is only one more thing Im curious about with this saw. Its a little steel disk with three holes. It was attached to the back of the saw when I bought it. It has two beveled screw holes flanking a threaded center hole.

 In doing some research on this saw I downloaded a Stanley Tool Catalog from 1914 from a site called Rose Antique Tools. The part is listed as 109 a Stock Guide Plate.
 And in the direct picture of the saw box, you can see it in use. Its obviously an attachment to set a repeatable cut for length. I just dont understand for sure how the Stock Guide works in conjunction with it.
I wonder if the stock guides I had made up should have one with an oblong slot down the center. After that its getting another thumb screw made. Im not sure Im ready to go through all of that, but it would be cool to know.
 Ive looked around some and not found any reference or seen any pictures of this part in use in the wild, and Id like to know how it works. If you have one, or some good pictures of one, maybe youll consider sharing them with me. Please drop me a line at oldwolfworkshop@gmail.com so I can share that information here. Id appreciate it.
Either way, Im calling this done (at least for a while) Old tool rehabs like this are fun distractions, but I am always happier when Im done with them and can get back to making saw dust. There is a certain satisfaction in making sawdust with a tool youve saved from the scrap heap, and there is no better way to get to know and understand a tool intimately. In the end Id rather spend time fussing with wood instead of fussing with tools.
Ratione et Passionis
Oldwolf
Read More..
Well the temperature is rising and the snow is melting fast and so this is a good day to go out and work on the bowl some more. Heres todays photos:
I began hollowing out the bowl yesterday and I probably cut away about half the inside of the blank. My goal today was to finish hollowing it out and hollowing a bowl presents a number of challenges. People place things inside of bowls so the volume of the bowl is one concern. Another is the thickness of the walls and the bottom-you want to wind up with a sturdy bowl that wont break if its dropped but doesnt look clunky. And the inside needs to approximately match the outside in terms of the shapes matching up.
Here is the first photo. Ive deepened the floor of the bowl and Ive begun creating the sides of the bowl. Note the position of the tool rest-it needs to sit inside of the bowl and as close to the surface as possible. This allows me to get the tip of the turning chisel into the wood without causing a lot of vibration in the tool:
Here is the bowl several minutes later. Its deeper and the sides are beginning to shape up. Note the raised section in the center. I like to leave cutting the center until well into the turning. It gives me a visual cue as to how much wood Ive removed without having to stop and measure the depth:One of the problems that turners encounter when making a bowl is vibration, particularly at the rim. This can lead to the tip of the chisel skipping across the surface of the wood as it spins. I like to keep the sides and bottom a uniform thickness as I turn. That really helps to counter that.Here is a photo of the rim. I want to have the rim and the width of the ribbon match up. I think this will look good and Im just about there in the photograph:
At this point I put the camera down and finished hollowing the bowl out. Another concern, and this happens with every project, is to know when its time to stop cutting something. Dont cut enough and you wind up with essentially an unfinished bowl. Cut too much and risk cutting through the bottom or ruining the design. How thin to make the walls and how thick to leave the bottom are also questions to be answered.I elected to leave the walls about 1/2" thick and the bottom about 1" thick. This last measurement includes the foot of the bowl. I think these are good measurements to stop with and I dont mine leaving this bowl, or any bowl for that matter, a little bottom heavy. It keeps the bowl from easily tipping over.
Here are the last two photos for this session:
The bowl at this points seems a little heavy to me so Im going to stop and sleep on it and return to the bowl tomorrow.See you Thursday,
VW
Finishing Up The Stanley 358 Miter Box and Saw
It is done.And better yet, it saws wonderfully. The old girl looks pretty good for being around a hundred years old. It took me a while to run the last leg of this race but yesterday I got my act together and finished the rehab.
What took so long was my wait for a couple parts I used a local metalsmith to fabricate. The stock guides are L shaped braces that I wouldnt call vital, but they are damn handy. They sit in shallow dados in the bed and clamp into place with a thumb screw clamp behind the fence.
When you place the stock on the bed, you snug up the stock guide to support the piece in place against the back and forth friction of the saw stroke.Yes you could hold the stock with your hand, but that may be more difficult when dealing with crown mouldings. They make using the saw much nicer.I tried to fabricate these by myself couple of different ways. I bought the flat and round steel stock and first I tried to drill and tap the end of the steel bar for a machine screw. I tried to be careful and take my time, I drilled the appropriate hole and used oil to lubricate the process. Yet my tap broke off inside the steel bar.
Crap.
So I went to plan B. I had read another online account of a similar rehab where the author fabricated his using a two part epoxy. I picked some up and gave it a shot. Again I followed the instructions carefully but I couldnt get the epoxy to hold up to even light handling. I was doubtful about it, but it was worth a shot.
One thing I dont have in my skill set that I would love to learn is welding. I cast around and found a local metal smith / artist who was willing to throw down a couple quick welds for me. After a few weeks I was able to stop and pick up the pieces.
Now I was in business. The only metal fabrication part I had left was a top bar that connects the two towers and keeps them from racking while youre sawing. This was a simple piece of flat stock, (the same as I used for the stock guides) and it took me re-taping and replacing one of the thumb screws with a replacement.
A couple of screws connected the saw box to a off-cut of 1x12 pine. Now I can cinch it to the bench with a couple holdfasts and store it underneath when I dont need it.All that was left was to sharpen the saw itself. I always kind of work myself up about before hand and when its over I think, "Damn, that wasnt so bad." For certain its not that difficult of a thing to learn, and the more I do it the better Ive gotten.One of the turning points for me was taking a saw sharpening class with Mark Harrell over at Bad Axe Tool Works. I wrote about that experience HERE. Working with Mark taught me to trust my the feel of the file and the things my eyes were seeing and has let me do away with the guide blocks and jigs Id been using up to this point. Knowing what to look for has improved my sharpening greatly. Hes teaching more of these classes. As I understand it a couple times a year. Drop by his site and get in contact with him about dates and details. Its so worth it.
Once I sharpened the teeth I used another piece of pine off-cut to test my work. Another trick I learned from Mark. I scribe a square line and saw it, burying the saw to the back. If the saw follows the line, were good. If it appears to pull to one side or the other, a little sharpening stone on the toothline will adjust that.This time things turned out just right. No stoning necessary.
Now would be the moment of real truth. Would the miter box give me accurate cuts? or would more adjustments be required?I grabbed a piece of cherry scrap and gave it a shot.
90 degree cut checked out perfect. No light creeping under the trisquare blade when it was checked.
Encouraging, but what about 45 degree miters.
According to my miter square. Accurate as can be. Im a happy boy!There is only one more thing Im curious about with this saw. Its a little steel disk with three holes. It was attached to the back of the saw when I bought it. It has two beveled screw holes flanking a threaded center hole.
In doing some research on this saw I downloaded a Stanley Tool Catalog from 1914 from a site called Rose Antique Tools. The part is listed as 109 a Stock Guide Plate.And in the direct picture of the saw box, you can see it in use. Its obviously an attachment to set a repeatable cut for length. I just dont understand for sure how the Stock Guide works in conjunction with it.I wonder if the stock guides I had made up should have one with an oblong slot down the center. After that its getting another thumb screw made. Im not sure Im ready to go through all of that, but it would be cool to know.
Ive looked around some and not found any reference or seen any pictures of this part in use in the wild, and Id like to know how it works. If you have one, or some good pictures of one, maybe youll consider sharing them with me. Please drop me a line at oldwolfworkshop@gmail.com so I can share that information here. Id appreciate it.Either way, Im calling this done (at least for a while) Old tool rehabs like this are fun distractions, but I am always happier when Im done with them and can get back to making saw dust. There is a certain satisfaction in making sawdust with a tool youve saved from the scrap heap, and there is no better way to get to know and understand a tool intimately. In the end Id rather spend time fussing with wood instead of fussing with tools.
Ratione et Passionis
Oldwolf
Rabu, 30 Maret 2016
Starting to Put It Together In My Mind
It wasnt really all that long ago, in historical terms, that average and mostly anonymous craftsman created many pieces of furniture that are cherished and venerated today. Their work commands a kings ransom at auction houses and is treasured in museums and the homes of collectors. It could be argued this reverence comes from the history and age associated with the pieces, but if thats the case why are the collections Ive been able to visit most housed in art museums? Why do modern artisans and craftsmen struggle to recreate these pieces down to the millimeter of accuracy. Lets not even mention the piles of plans and measured drawings produced by the woodworking media to sell us the latest "newly discovered, never before published" version of a Newport Highboy or Shaker Cabinet.
Ive been thinking a lot about design and furniture styles and nearly everything encompassing those circles lately. The impetus for these rumblings comes from two sources. The first is our new house and the sad fact that we dont have enough good furniture to suit ourselves. I can build furniture and I can fix this problem, but I want to build furniture that will last us the rest of our lives, so building beautiful furniture that is designed right for our tastes and lifestyle is important. I want the pieces I build to work together with each other and with the house itself. Similar in experience to what I was talking about HERE after reading "Poems of Wood and Light."
The second is I have been reading my way through the new book from Lost Art Press by George Walker and Jim Tolpin called "By Hand and Eye." The book speaks to me from my own interest in history. Ive spent good time and energy figuring out how woodworkers of the past created furniture from a technical point of view. Planing boards flat by hand and cutting dovetails with a backsaw. But the technical side is only half the picture. Knowing how to fold a crease into a piece of paper doesnt give you the ability to create origami and knowing how to make a mortise and tenon joint with a chisel and saw doesnt imply the ability to make beautiful furniture.
"The Joiner and Cabinetmaker" is one of the better woodworking tomes put to print in the last decade or more. Ill give the caveat that it is a mostly a reprint of an older book accompanied by research. In general it is very well received and I cant remember ever reading a dissenting or belittling review of it.
Fairly early on in the text of the actual book (Pg 56 - 58) there is a small passage that fascinated me when I read it, yet it seems to have garnered little notice. Reading "By Hand and Eye" brought this passage back to mind and I had to revisit it again. It tells about the care an apprentice must take if he is to go out to a customers home and measure the space to fit a new cabinet. It goes on about how he must carefully check and double check the height, width, depth, and write these numbers legibly on a piece of paper, scratching them onto the back of a snuff box with a point of a nail is unacceptable.
The books point of view puts you in the shoes of the apprentice, but after re-reading the book a couple times I started to think of this passage from the journeymans point of view.
Picture it.
Youre working hard in the shop on a Wednesday morning, putting the finishing touches on a clients chest of drawers. Suddenly the Master stops at your bench and hands you a piece of paper with measurements the apprentice Thomas was sent to collect yesterday. On the paper is the numbers for height, width, and depth and maybe a few other notes in the Masters hand. The cabinet is to be made of oak and deal and have drawers underneath and doors on top.
Now hop to it!!
I would argue that anyone could slap a box together to fit into those proscribed measurements, but you have to take into account the information and tradition reinforced in the rest of the book. The apprentice tradition described worked very hard to build on a foundation of good, careful, quality work. A tradition of doing things the right way the first time. It was of the utmost importance the client be happy with the finished piece and all the careful dovetailing in the world wont help a malformed, misshapen piece that belongs on the island of misfit toys.
I wonder how I would fare if placed in that situation. Surely I could hit the measurements, but would my work have visual appeal? Would it be utilitarian enough to perform its duties? Would it survive the test of time and someday be placed in a cozy,, climate controlled museum as a prime example of furniture from the period.
I probably could do all these things if given enough time and enough chance at trial and error. Certainly if I sketched out a measured drawing or four then proceeded into several versions of mock-ups and prototypes until I had the details dialed in satisfactorily. But could I do all this and build the final cabinet in around a weeks time?
The end of this passage in the book talks about Bill Sharp. He was a good workman who was just a little sloppy and poor at taking and following measurements. He was dismissed from the shop because his cabinet wouldnt fit in the space measured. The book says it was a good cabinet though and it only took him a week to build it.
Could you design and build a successful cabinet in a work week?
Up until now Im not sure I could either. But the book "By Hand and Eye" is opening my eyes on how an 18th century journeyman may have attacked the problem "at the point of the tool" and it has been quite a journey for me so far. Ive not even finished my first tour through the pages and Im already picking up so much. I should say Im relearning a lot of the things I learned to years ago in Art and Humanities classes and have forgotten or misplaced over time.This is a good thing.
Im learning its OK to trust my eye. Learning to break things down into shapes and proportions. Learning to size things to the body and the space its to fit into. Other design books Ive read have been profiles in particular styles or focused on measurements with some nods to perspective and other larger ideas. They just havent been all that this book has been so far.
Cutting dovetails is easy. Designing the right piece, with the right place, for those dovetails, thats much more challenging. With the furniture I have to build for this house and the work I want to accomplish in my writing pursuits Im glad to have this book in my hands and now that the new shop is finally in order, I can start to put it to practice and build the pieces that fit us, fit our house, and fill our lives.
Ratione et Passionis
Oldwolf
Dado the Day Away
Is there anything better than a day in the shop spent cutting joinery? Not many things thats for sure. Thats what I got some time at doing in the shop. Not the fancy "Look at me" joinery like dovetails and drawborn mortise and tenons, but the standard bread and butter joinery. Rabbet joints and Dado joints, the behind the scene heroes that really make a piece work well and hold it together for the long term.
I think what I like about cutting these joints by hand is how some modern woodworking product makers would like you to think that this work is unnecessary. Dont cut a dado for that shelf, clamp it in place with our special high carbon steel, cryogenicaly treated three way clamp, drill it with our laser guided, heat seeking, over calibrated pocket hole guide, and secure it with these special screws, the ones you can only buy from us.
Now dont get me wrong, I do own a small pocket hole jig, and there are times when it is the right choice for joinery. I have seen some antique, heirloom pieces of furniture where pocket holes were used effectively. But if you take the product material you get with your Kreg jig at its word youd believe its your one stop for connecting wood of all kinds. Build yourself a whole kitchen worth of cabinets with a mountain of plywood, a table saw, and a Kreg pocket hole jig. So easy my 8 year old can do it!
Seriously, real furniture screams for real joinery, and even though this is a simple shelf to hang on the wall in my shop, there is no reason I see to skimp and scrape on things that I feel are, so elementary, so basic to quality woodworking.
There are a lot a ways to go about cutting this kind of joinery, it should come as no surprise that I prefer to cut mine by hand.
 A simple rabbet plane is such a straight forward way to cut the rabbets. For the sides of the case, which are to be dovetailed I cut them as stopped rabbets, leaving the end 3/4" intact. Simply done I use the plane to remove the majority of the waste in the center and finish the clean up to the ends with a chisel.
 The stock for the top and bottom of the cabinet is much simpler to cut.
Now it was time to lay out and cut the dadoes, five stopped dadoes per side, ten in all. This is how I go about doing these.
 It starts with careful layout according to calculations and plan Ive drawn up in my sketchbook. Using my folding rule and making small pencil marks to set the space for the shelves.
 A try-square and a marking knife follow connecting the small marks into the full layout. I planned these as stopped dadoes so I used a pin marking gauge to mark the ending line an inch from the edge. For the purposes of taking pictures for here on the blog I then go back and darken in the marked lines with pencil.
 I then attack with saws. I start the line with a light cut with my dovetail saw. The reason is that it makes it easier to start the stair saw into the cut and then easier to keep the saw straight. The blade of the saw is 3/8" deep and so all I have to do is cut until it bottoms out. Admittedly cutting to a stopped dado is more difficult that just following the cut all the way across the stock, but this is a truth no matter what method you chose to use.
 I then chunk up the waste in between the cuts with some chisel work.
 Then using the same chisel I chip out the waste, I am not trying to make a clean bottom or smooth cuts, I am trying to remove as much of the material as possible as quickly as possible. The clean up comes next.
 I then grab for my router plane, I have it set to the full 3/8" depth of the dado cut and I use that to clean up and even out the bottom of the excavation. Sometimes this is a process of moving back and forth between the chisels to remove a higher point and the router plane to set the depth consistent.
 I then use a wider chisel to clean up the sides of the cut. I do work hard to keep the joint cut within the tolerances originally laid out. This is where I work to make the joint "pretty" Im not worried about perfection on a joint like this, I am worried about accuracy and functionality and this is where I finish that part of the process.
 After cutting for both sides I lined them up one on top the other to check my layout to triple check that I had gotten it right.
Just a quick work about speed when it comes to handwork. I took my time working on the first side, taking lots of pictures and trying to set myself up for this post. But when it came time to cut the second set on the other side I decided to time myself and see just how fast I could pull it off. With the layout already done I cut five stopped dadoes in around 18 1/2 minutes total. Now at first you may think that seems like a good amount of time compared to what one could do with a router or dado blade on the table saw. But the stop and think about it.
Add in the time it takes to set up any jigs, sliding table, sacrificial fence, parallel clamps. Dont forget the time it takes to do the test cuts, measure, reset the jig and repeat the test cut. Take the cut in steps. Then because its a stopped dado, still have to grab that lowly chisel and square the ends of the cut, or round over the ends of the shelf stock that is to fit in the joint later.
In the end, I figure its a wash really, I dont claim my method is faster, I just stand by the idea that working by hand can be every bit as efficient and quick as working with electron. I keep and use power tools too, I just dont believe they are always the answer and for me, when I used to work almost exclusively by electron, I used to hate how almost every operation needed a different jig, and sometimes it seemed like I spent nearly as much time building jigs as I did building furniture. If you ask me Id rather build furniture.
Cheers
Oldwolf
Read More..
I think what I like about cutting these joints by hand is how some modern woodworking product makers would like you to think that this work is unnecessary. Dont cut a dado for that shelf, clamp it in place with our special high carbon steel, cryogenicaly treated three way clamp, drill it with our laser guided, heat seeking, over calibrated pocket hole guide, and secure it with these special screws, the ones you can only buy from us.
Now dont get me wrong, I do own a small pocket hole jig, and there are times when it is the right choice for joinery. I have seen some antique, heirloom pieces of furniture where pocket holes were used effectively. But if you take the product material you get with your Kreg jig at its word youd believe its your one stop for connecting wood of all kinds. Build yourself a whole kitchen worth of cabinets with a mountain of plywood, a table saw, and a Kreg pocket hole jig. So easy my 8 year old can do it!
Seriously, real furniture screams for real joinery, and even though this is a simple shelf to hang on the wall in my shop, there is no reason I see to skimp and scrape on things that I feel are, so elementary, so basic to quality woodworking.
There are a lot a ways to go about cutting this kind of joinery, it should come as no surprise that I prefer to cut mine by hand.
Now it was time to lay out and cut the dadoes, five stopped dadoes per side, ten in all. This is how I go about doing these.
Just a quick work about speed when it comes to handwork. I took my time working on the first side, taking lots of pictures and trying to set myself up for this post. But when it came time to cut the second set on the other side I decided to time myself and see just how fast I could pull it off. With the layout already done I cut five stopped dadoes in around 18 1/2 minutes total. Now at first you may think that seems like a good amount of time compared to what one could do with a router or dado blade on the table saw. But the stop and think about it.
Add in the time it takes to set up any jigs, sliding table, sacrificial fence, parallel clamps. Dont forget the time it takes to do the test cuts, measure, reset the jig and repeat the test cut. Take the cut in steps. Then because its a stopped dado, still have to grab that lowly chisel and square the ends of the cut, or round over the ends of the shelf stock that is to fit in the joint later.
In the end, I figure its a wash really, I dont claim my method is faster, I just stand by the idea that working by hand can be every bit as efficient and quick as working with electron. I keep and use power tools too, I just dont believe they are always the answer and for me, when I used to work almost exclusively by electron, I used to hate how almost every operation needed a different jig, and sometimes it seemed like I spent nearly as much time building jigs as I did building furniture. If you ask me Id rather build furniture.
Cheers
Oldwolf
Postingan Populer
-
 Project bucket lists are a subject that gets broached by woodworkers and bloggers from time to time. It is a good exercise to go through and...
 -
 All children are artists. The problem is how to remain an artist once you grow up. -Pablo Picasso In a phone conversation with a recent clie...
 -
workbench plans free download The best source for ...
-
 "I really care about what I do; not only in the end result but also in how it gets done. In todays fast paced, almost out of control wo...
 -
Pathways to apprenticeship. there are a number of different ways to enter an apprenticeship in ont...
-
 Good Morning All, Ok, Im back. Ive assembled the headboard and here are some photos: In this photo Im about to begin attaching the panel boa...
 -
 Hi Everyone, Ok, Im back. Here is the box with the lid on the lathe. Im getting ready to finish the top of the lid: Now Ive taken away the t...
 -
balsa wood projects for free Balsa wood projects for free, this… | chair...
-
 Boy oh boy am I gonna feel it in the morning. I can tell already. I didnt have a chance to do much today, I only ripped two 2x8s in half. I ...
 -
 Hi Everyone, Here are the completion photographs for the gift boxes. Im pleased with the way they came out: This is the hackberry box with a...