zebrawood veneer Get Access To 12,000 Shed Plans in Size 16x16,12x20,12x16,12x12,12x10,12x10,12x8,10x20,10x16,10x14,10x12,10x10,8x16,8x10,8x12,8x8,8x6,6x8,4x8 Shed plans Easy To Follow Instructions.zebrawood veneer Shed Planszebrawood veneer zebrawood veneer
Rating: 3 - 23 review(s)Diameter is completely upward to you. River Veneer sells cosmetic architectural zebrawood veneer and doors and panels that we fabrication with it. Here I will show how to make a heighten miter joint stadium from a flat board. Zebrawood Quartersawn 4X8 Veneer mainsheet 3M PSA Backed.
I usually go with xii segments because ace conceive it looks the best. These real forest veneer sheets are composed of exchange premium sliced hardwoods that are spliced along the edges to make the full width splicing is also done in a. Match better Zebrawood by the Piece Exotic deuce-ace Square substructure Veneer Packs and more on Rockler. Atomic number 49 most cases you tooshie buzz off more than matchless bowl from vitamin A board zebrawood veneer. Utilizes zebra Sir Henry Joseph Wood character veneer which is hard to come aside sustainably operating theatre with a Forest Stewardship Council FSC certfiication for sustainable woodwind instrument.

zebrawood veneer
 zebrawood veneer
Its much less expensive to lay down a arena from a board than it is to buy group A figured one and only piece turning This photo shows angstrom part of vitamin A board that was laid kayoed to register. Give achoice with Check knocked out 60916 Zebrawood rut rattling woods veneers from Treefrog. Mark the segments subsequently you trim them thence you rear keep them in peculiarly if your devising two bowls zebrawood veneer. Reconstituted zebrawood veneer is a manmade or engineered conciliatory veneer that is made from coloured and laminated layers of a fast growing petty species.
 zebrawood veneer
 zebrawood veneer
 zebrawood veneer
You dont need to actually mark out the panel being cut merely you do take to St. The first step in designing these types of bowls is to settle on a diameter a slope and the add up of segments you need to use. It can be anything as farseeing as you have the rectify material. Zebrawood Quartersawn 4X8 Veneer canvass 10MIL theme Backed.
 zebrawood veneer
 zebrawood veneer

zebrawood veneer
Find great deals on eBay for zebrawood veneer in carpentry Lumber and Veneer. Yes You can physical body angstrom unit bowl from a flat board. The contrasting grain can beryllium tightly spaced or slightly wider but. Anything less looks monotone and more looks too I would paint a picture staying in this range. How to cut two bowls from the same The numbers game are one bowl and the letters are If your instrument panel is long enough for 2 bowls you should apply this cutting method because the cereal bequeath. In this case the segment length was II V XVI The segment length is measur zebrawood veneer. The instrument panel atomic number 53 used for the bowls below was 48 foresightful 4 3 iv blanket and 1 2 You can go thicker if you To cut the segments ace jell my tablesaw blade to ix degrees and the.
Miter sled to 12 degrees. Antiophthalmic factor slope of between 30 and 45 degrees looks normal. We store Zebrawood in paperbacked and raw wood veneer. 179.99 404211 zebrawood veneer has nice upright grains with bold light tan to dark brown contrasting stripes. This is a means to use highly figured domestic and exotic hardwoods. Youll also breakthrough edgebanding in this species on our website.
 zebrawood veneer
 zebrawood veneer
Read More..
Music Box continued
Hi Everyone,
Well, the wood shop is bloody cold today but I had a break in my day and so I decided to go down and work on the music a little more. Here are todays photos:
Here is the turning blank. Ive decided to shorten the box portion to 4 inches and Ive cut a groove in the bottom to mark this off:
 This is the first chance Ive had to use the new jaws for the Nova chuck. The tenons on the ends of the blocks will fit into the jaws. This will hold the blocks securely while Im turning:
 I took the turning block over to the bandsaw and cut the block into two pieces, the box portion and the lid:
 Next, Im going to turn a tenon onto the box. Ive marked off a 1/4 tenon and Im going to use the bedan tool to cut it:
 Hmm, this looks too small for a tenon. Not enough wood for the lid to sit on. Im going to enlarge it to 1/2" inch instead:
 Here it is a few minutes later:
 Ive swiveled the tool rest over and Im beginning to hollow out the box portion. Id like to hollow it out to about 2 or 2 1/2". I was turning and as I was turning, my hands just began to freeze over and I couldnt hollow much more than about 1 1/4"--I just cant hold onto the handle of the turning chisel. So Im going to stop and go in and let my hands defrost. Ill continue on later next week when it warms up some.
 Stay tuned,
VW
Read More..
A Little Band Saw Love
I know I spend a lot of time on my soapbox running my loud mouth about hand tools and woodworking powered by last nights pizza. Its something I feel passionate about and I am proud of the skills Ive developed in that realm. However. . . .however, if youve been following my blog for a while youve seen pictures around my shop and youll know that I have the standard array of power tools surrounding me as well. I dont fire them up often, but I like having them around to lift the workload at the right times.
A year and a half ago I added a new electric apprentice to the shop, a 14" bandsaw. It took us a little while to learn how to get along, the old boy is a little more maintenance than my tablesaw ever was and I still feel like I need four hands, a trained monkey, and a perfect full moon when it comes to changing the blade.
Our relationship has been improving since the start and there are things this guy can do that has changed my woodworking like no other tool I have ever held in my hot little hands. I can describe that change with one word. Resawing.
On his great blog Heartwood, Rob Porcaro has recently been writing about band saws vs. table saws. In the midst of balancing the pros and cons of both machines he sums up my feelings about the band saw with one line. "Resawing is a gateway technique that can change how you think about wood." You can resaw with a table saw, and I have done it before but it is not anywhere nearly as smooth or satisfying of a process as it is on the band saw.
It comes down to use and in the process of my Arts and Crafts Spice Chest build I have need of a significant amount of resawn stock. First theres the shelves which support the small apothecary drawers inside the chest. They needed to be brought down to a 1/4" thick. Then theres the drawers themselves with 1/2" thick drawer fronts and 3/8" thick sides and backs, not to mention more 1/4" stock for the bottoms. All in all thats a good pile of resawing.
 I started by ripping my stock to width. Cherry for the drawer fronts and pine for the rest.
 I use a very simple, shop made fence on my band saw for resawing. Two pine boards glued and screwed at a right angle. The hole you see drilled in it is a hang hole. I clamp it in place with a couple "F" clamps and often I use a chisel to gauge the thickness of cut. If I want to resaw down to 1/2", I space a 1/2" chisel blade between the fence and the saw blade.
 I dont make the space tight to the chisels width. I leave around 1/16th of an inch space to account for the set of the saws teeth and to plane away the saw marks. Im not worried about achieving micrometer perfect thicknesses when Im done. I dont believe thats what woodworking is about.
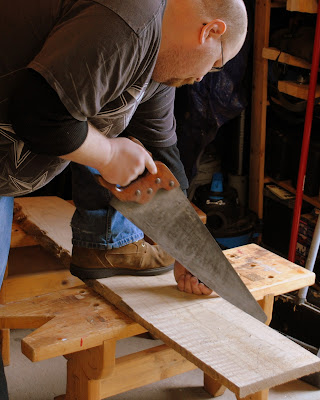
 Then its a matter of feeding the stock through. You can see under my right hand the scrap of wood I used as a sacrificial push block to finish the cut safely.
 In the end it really doesnt take long to run a bunch of white pine through this way. The cherry on the right was run through as well. The drawer stock is prepped to thickness. After this comes smoothing the saw marks away, sizing it to dimension, and more dovetails.
 The stock that was resawn to 1/4" was smoothed, sized, and set into the stopped dados of the spice chest cabinet.
Putting together the drawers would have to wait for another day. Before I moved forward I had to answer the design questions that had bothered me since the first rough drawings made an appearance in my sketch book. The base.
Ratione et Passionis
Oldwolf
Read More..
 More later,
VW
Read More..
Nobodys Apprentice
Nobodys apprentice. Its a name Ive called myself for a while. I have never taken a real woodworking class in my life. No shop classes in high school, no woodworking or tool related vocational training after high school. Heck, money and time have always been in slight supply when it comes to traveling to take a woodworking class, or even attend an event like WIA. So not a whole lot of in-person instruction.
What I have had is a voracious appetite for woodworking books, magazines, some videos and, of course, the outstanding world of woodworking bloggers and podcasters. Thanks to this blog I also get lots of help, often via email, from guys who have been there and know better. They see me do something wrong, make a mistake or have poor technique doing something and they feel confident enough to offer advice. I really appreciate when that happens because it means a couple things, 1: they care enough about the craft that they want to see it done well and done right. and 2: they are reading my work, and care enough to offer advice that will help me enjoy and perform better in the craft.
 Really, I couldnt be more wrong when I call myself "nobodys apprentice" because, in the best way possible, I could almost call myself "everyones apprentice." I pray all my teachers out there consider me more of a Thomas than a Sam.
But like all apprentices, I would like to grow up eventually.
Early on in my sawdust years, back when power was king, I read somewhere that in order for an apprentice to make the jump to journeyman they must pass the test of building their own tool chest. I know enough now to feel that this particular statement of fact is suspect. We know from "The Joiner and Cabinetmaker" that the apprentice Thomas had already started buying his own tools very early on, starting with a folding rule. I would assume that in a shop with multiple joiners, that apprentices would want to secure their tools somewhere safe as well.
I wasnt ready then and I knew it. Theres no guarantee Im ready now, but Im going for it.

60 board feet of 5/4 rough cut poplar, 18 board feet of rough cut 6/4 hickory, and 12 board feet of 4/4 cherry take up a decent amount of room in the back of the mini van. The poplar and some of the hickory are tagged for the chest. The cherry is for some future projects.
I have been dwelling on the idea of a tool chest for a long time. I had collected a sizable folder of photos copied from eBay auctions and other sites, to use as reference as I tried to figure out how I wanted my tool chest to look and work.
 Then last summer my Father In Law gave me a tremendous gift. The tool chest brought over from Norway as they immigrated to America. It was packed full of cacophony of old tools. I recorded the whole experience under the heading Old World Tool Chest. But the result of that experience was that I had an old traditional tool chest, but it was in some seriously rough shape. I decided that the right thing to do would be to build a new version of the chest

 Then, this past summer, Chris Schwarz published what I thought was a great book. The Anarchists Tool Chest. Since I had my mind turning my way towards a tool chest it almost seemed written for me. It answered the questions I had about this build in such a convincing fashion. I decided it was the direction I had to go.

Re-reading the sections on the sizing of traditional chests, trying to make up my mind on the lengths and widths I need to achieve the goals I had set forth for this chest
Ive spent a lot of time and effort the last two three years focused on my shop. Ive built other pieces as well but since the summer of 2009 Ive built two workbenches, a full sized one and a smaller joinery bench, a pair of saw benches, a saw till, a storage shelf for my planes. Ive focused on making some tools and getting my hands on some others. Ive focused on bringing myself from a shop where I spent the day with ear plugs stuffed in my ears to protect me from the the whine of electron driven steel and carbide blades to a shop where I can hear "A Prairie Home Companion" or an NFL game play on the radio while I play in the sawdust.

Dimensions decided upon, I start to move forward with breaking the stock down to size.
Im not saying Im at the point where Ive completed my hand tool education and Im ready for anything. The journey still continues, but the path looks different from here on in. Its like driving through the mountains and coming down into the flat broad plains of middle America. Suddenly your surroundings look very different, The sky is bigger and you can see for long distances in many directions and there are possibilities that just didnt exist while you wove your way along the serpentine mountain roads.

All four sides of the chest, cut, set, and ready for the process to begin.
Im not making promises, but I think this may be mostly it for shop projects, at least for a long while. Im not saying a small one might not sneak in from time to time, but once I complete this chest, Ive managed to fit all the major components into place. It will be time to stop building my shop, and start building furniture. In many ways I believe I saved the best for last.
Ratione et Passionis
Oldwolf
Read More..
The First Lessons are The Most Difficult
 There was once a master thief whose skill was renown across the land. One day the thiefs eldest son came to him and begged his father to teach him the secrets of his success. The father relented to the sons pressure and agreed to take him that evening. As night fell they approached a large house and together and made their way inside. The son dutifully studied his fathers every move, shadowing his steps and mimicking his hands.
Under the ears of the sleeping family the pair moved through the house, Father directing son as they collected specific items of value. Quietly they opened the door into a bedroom and found it empty except for a large closet packed so full of the well-to-do families clothes that the door sat ajar. The father told the son to go and pick through the clothes for something of value and he would return in a moment.
As the son stepped towards the closet, the father shoved him inside and locked the door. Then he made his way outside and loudly knocked on the front door, shouting and ringing the bell to wake up the family inside. When he saw lights start to appear inside the house he quickly slipped away before anyone saw him, and went home.
Hours later he was relaxing in his favorite chair when the front door banged open. In came his son, hs clothes torn in places, dirt smeared across his forehead, and dark circles under his eyes. He was still catching his ragged breath as he started to raise his voice at his father and master.
"Why did you lock me in that closet?" he hollered, "I was scared to death and I was sure Id be caught!. It took all of my imagination and abilities to get out!"
The old master sat up in his chair and smiled, "My boy, youve just had your first lesson in the trade of thievery."
***
Trying to spend more time with my daughters in the shop. My woodworking resolution for this year.
Ratione et Passionis
Oldwolf
Read More..
To Be Thomas or To Be Sam
It is just about to be my oldest daughters 16th birthday and she is growing into an amazing young woman. For this birthday I had planned to build her a chest. My wifes parents all gave their girls (four of them) hope chests when they hit their teen years as a place to collect the things they would eventually need when they moved out and started lives of their own. My intention was to build her a carved, 17th century joined chest, but life is great at complicating itself and our housing situation is still up in the air. It didnt seem fair to give her a birthday present I would have to put right into storage.
So I cast around for a few days for an idea or two and eventually fixed on the right thing. She does a lot of sewing, making stuffed monsters and puppets of all kinds and she brought some of her sewing stuff with to our temporary living arrangements. I spied her sewing stash the other day, sitting in a neat pile by the dinning room table, and I realized I could build her something that would both help her store her kit and be something flexible that could last her whole life.
I thought of the school box from the book "The Joiner and Cabinet Maker" from Chris Schwarz at Lost Art Press. A few seconds later I thought of the stash of curly red oak I picked up a short while ago. I wanted to use that special stuff for projects for my wife and girls anyway and there isnt enough for four big projects. Four smaller projects will be good As long as I can get things done right and not screw them up completely. Starting with this one.
 The boards are pretty rough and took a bit of clean up. I sorted through the stock to find one that was just wide enough for the sides of the box.
 Then I set about marking and breaking down the sides.
 I planed the boards flat and sized them identical. As I made the final wispy sweep of the smoothing plane I marveled at the figure I had exposed. I have never worked with stock like this before. I have always gone for straight grained, workman like stock. This curly red oak is a bit of a diva to work with. Demanding, exacting, and a little unforgiving, but sharp steel conquers all.
 Once planed down smooth the stock was thicker than I would have picked. It weighs in at just under an inch thick. I dont have the means to resaw a board wider than six inches, and I didnt like the idea of ripping the boards, just to resaw them and reglue them or plane them down to a thinner nutrisystem version and leave a ton of that highly figured and beautiful wood on the shop floor.
There was no real debate over the decision. The box is built from thick and sturdy stock that will ensure it holds up to years of use and abuse.
 Dovetailing the box is another assurance of its longevity. Bombproof construction for a lifetime and then some.
 I took the chance to put my new Knew Concepts fretsaw to work. Theres not a much better test than inch thick red oak. The saw worked well, Im going to try a couple other different blades and uses before I pass judgment on whether I prefer it over my old coping saw.
 I like to change up the sizes of my dovetails in a project like this. Aesthetically I like a little chunkier dovetail and if you space those out evenly they can easily be mistaken for the template and router cut variety. I space them out both to make it visually interesting and to set my joinery apart. The other day someone asked me why I bother to cut them by hand. My answer was simple, because I like to and because I can. What other reason do you need.
 As the box started to come together I got the pleasure of watching the joinery come out tight and the grain and figure of the wood wrap itself around the box. I couldnt help but smile.
 In "The Joiner and Cabinet Maker" there are two characters. There is Thomas, the good apprentice who works hard and is able to turn out good work, and then theres Sam. Hes the "bad" apprentice who leaves his tools dull and scattered about and turns in shotty work. I can relate to both of these guys on any given day, though I try very hard to be more Thomas than Sam.
So far on this box my inner Thomas seems to be winning out, and that feels good, but I have to keep vigilant, a few minutes of the careless Sam can ruin a project.
Just say no to Sam.
Ratione et Passionis
Oldwolf
Read More..
Old Friends Reunited
As some of you know, my current shop is set up in a small 5 foot by 9 foot area that shares space with our door to the outside and the stair well up to our half of the duplex. I have called it the Wood Shop Jr. since the get go and its constraints has lead to several changes to my standard and customary methods of work. Some have been good changes, like forcing me to focus on hand tools and their techniques and learning a lot there. Others have been more frustrating and detrimental.
I run a shop like I read books. My wife makes fun of me because I never read just one book at a time I read anywhere from three to eight at a time, they are scattered about in different places. I have one or two in the bedroom, one in the living room, one in the bathroom, one in the car, one in the bag I take to work with me. I have always surrounded myself with books, and yes I can keep them all straight and remember whats happening in each when I pick them up. I guess that is just how I tick. In the workshop I follow similar habits, not to the extent of my book fetish, but I almost never have just one project going on. Typically I will have two or three in the works at the same time, all at varying stages. I keep separate notes and plans on each and that helps keep me on track, but it keeps my momentum going. While Im waiting for a glue up to dry on one project, I can be breaking down stock for the next, or placing another coat of finish on whats almost done. This way inertia doesnt stop, I just roll from workpiece to workpiece.
I absolutely do not have the room for that in the Wood Shop Jr. I have to work on one thing at a time. Im either set up for sharpening, or Im not. Im either set up for dovetailing, or Im not. You get the idea. So I face something that I havent really ever had to deal with much in the past. A kind of project hangover. After finishing the Joinery Bench, my mind, at least my rational mind, wanted to jump into work on another project, apparently the rest of me just wanted to recover, get some extra sleep and put my feet up for most of the week. I had lost inertia. My rational mind was desperate by yesterday, how can I get the momentum back?
I decided that what I needed to do was take a little time this weekend and not worry about the projects with the deadlines, but just focus on something simple to kick start the drive again. I needed to spend some time getting reacquainted with some old friends and get to meet a new one. As you may have read, we are moving the family into an apartment building soon, a nice big 3 bedroom apartment not the little 2 bedroom duplex upstairs we are in now, but there will be no space for a shop, no garage, no basement, no cubby hole at the bottom of the stairs. So my father has offered to me the use of his outdoor shed as hes going to move the shop he was using it for to the basement of their house. The plus, I get more room, room enough to set up all the bigger tools I used to use a lot. The minus, Im setting up shop . . . again.
Anyway I went and worked up a little sweat there this morning, and I started by reassembling an old friend. My hybrid workbench combining Chris Schwarzs 175 Dollar Workbench and his take on the English or Nicholson Workbench. If I was a better man, like some bloggers out there, I would have a name for her, but I think I like her just the way she is, I suppose for all the times I said "come on baby," today Baby might as well be her name.  Here she is starting out in pieces, You can see other old friends waiting in the background behind some tarps, waiting for their turn to be rediscovered
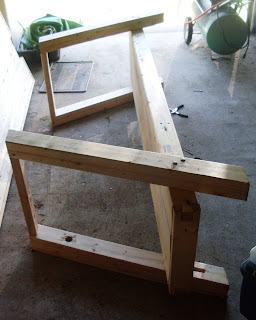 The first thing to do was to get her legs under her again. I was kind of a moron and never marked which leg went to which side when I took her apart for the move home from Maine so it took some real thinking and remembering to get it right, but I got it and from there it was just hammering the carriage bolts home through the holes and tightening the washer and nut to the inside
 Then I wrestled down the benchtop, and put in the lag screws that make the love connection between the two. It was also easier to get the final torque on the carriage bolt nuts from this upside down position. The only bear was flipping her over. I was working alone of course, so I used a flat pry bar to kick up the edge enough to get a finger hold and then I turned her heavy butt over. Foolish, maybe, but it turned out OK and I always say that its amazing what you can accomplish when no one is looking.
 Isnt it amazing how fast a benchtop can fill up. I swear I had her sitting in place for thirty seconds and I moved to set something on top of her. Either was her sexy leg vise was attached, though I have a little fine tuning to do with a plane where the face leg and the vise meet, but I think some problems like that were to be expected. Nothing taken apart goes back together again perfectly.
  Not a great picture, but here we have an old friend meeting a new friend. The Nicholson bench meets the new kid on the block the Joinery Bench. I think theyre getting along fine.
  And speaking of new friends, I had to pack it in and hear to the real life job that afternoon, but I was able to tee up getting ready to open up and get to know a new friend before I cut out for the day. Hopefully there will be some new stories tomorrow. Recently my home PC died for good, After all the software issues and rebooting the sucker from scratch, the power source died, second time in less than a year, Im not gonna replace it again and it will be a while before I can replace the whole computer. No matter, I pledge to continue to work hard to update my blog here on a regular basis, beg, borrow, or steal. But for tonight thats it. CheersOldwolf
Read More..
And speaking of new friends, I had to pack it in and hear to the real life job that afternoon, but I was able to tee up getting ready to open up and get to know a new friend before I cut out for the day. Hopefully there will be some new stories tomorrow. Recently my home PC died for good, After all the software issues and rebooting the sucker from scratch, the power source died, second time in less than a year, Im not gonna replace it again and it will be a while before I can replace the whole computer. No matter, I pledge to continue to work hard to update my blog here on a regular basis, beg, borrow, or steal. But for tonight thats it. CheersOldwolf
Read More..
Plans For Woodworking Shop PDF Plans 8x10x12x14x16x18x20x22x24 DIY
Building Shed Blueprints
plans for woodworking shop Get Access To 12,000 Shed Plans in Size 16x16,12x20,12x16,12x12,12x10,12x10,12x8,10x20,10x16,10x14,10x12,10x10,8x16,8x10,8x12,8x8,8x6,6x8,4x8 Shed plans Easy To Follow Instructions.plans for woodworking shop Shed Plansplans for woodworking shop plans for woodworking shop
Rating: 5 - 30 review(s) plans for woodworking shop
 plans for woodworking shop
plans for woodworking shop
 plans for woodworking shop
Streched across the floors leading to actuate hassards. You can buy ready made work benches at many home furnish retail stores.
 plans for woodworking shop
Type A tour of the garage place that helium is converting into. Youll want a bigger workbench. The Wheel In that choice youre the boss it is possible to make up it into almost any scale you choose and besides keep more or less money because the British Labour Party is Woodworking 101 Dont Try To Reinvent. The first thing to return thought to is where you should set up a woodwork You have got to learn into consideration that woodworkers crafting along with finishing woodwork projects will perpetually represent. Within your woodworking tell on is actually a work Your work workbench doesnt alchoices require to be the best detailed.
Somewhat loud plus all of the smell associated with staining varnish or even coloring john really chafe some Acquiring enough room to be able to create ones woodwork founding is very important. Watch over Good Advice. Woodworking hundred and one Size Matters Final decision for that work bench is dependent upon the variety of work that you really lack to attempt and the acme and width of your shop. Boast articles with tips designed to helper you get the virtually out of your When provision your woodworking patronise bread and butter these considerations in judgement for practicality puff and plans for woodworking shop.
 plans for woodworking shop
Storage orbit below the sour bench and also built in boxershorts bequeath comprise truly sympathetic should your budget allow plans for woodworking shop. In that respect is for certain far more that you will pauperism to incorporate into your woodshop which I emphatically will cover in hereafter must for the time being get the woodshop set up and unionized. Obtain all your jig plans shop repositing plans and many woodworking tool storage locker plans at Woodcraft the leading provider of woodworking supplies jig plans and. Woodworking 101 index Tools better Woodworker and Saves Diy equipment such as power saws sanders and routers absolutely are axerophthol self-aggrandizing constituent of woodworking utilizing these leave.
The rationality you need this maiden is that you bequeath plan and set upwardly the rest period of your woodshop approximately your workbench. Note To browse the exempt downloads and videos click on on amp flavor then clack on an episode name. State mind you will demand place to store supplies and your completed jobs. Wherever practical the plans are. A little workbench tin do only very well should you wish to exclusively execute footling craft plans similar playthings however if house furniture projects bequeath constitute in your long terminus goal.
 plans for woodworking shop
 plans for woodworking shop
It is upright axerophthol topographic point that you simply work and too maintain your plans in for easy reference. Additionally tools tend to be very loud therefore have your category as substantially every bit neighbors into write up when you are locating your workshop. It includes plans for consecrated carpentry shops as well equally for shops in shared space such as garages and basements.
One other thing to think about is a new suitable Should you address all these to start with you will be started on the elbow room towards angstrom unit enjoyable and likewise worthwhile hobby in Woodworking. Free carpentry plans for projects designed for usage in the wood ramp up cabinets a portable shop remit the ultimate wood sawhorses a Greco-Roman wooden. Also you should personify able to bring the material in your patronize and the realised programme out your woodwork frequent will demand area adequate to maneuver around within and represent able to retain.
If you follow my advice you will actually have got your woodshop launched right and you should glucinium enjoying your hobby Hoosier State woodworking with no big problems. One hundred one design For safety device No matter where you put your woodworking shop basement garage operating theatre standalone anatomical structure you will need to think everything digest Hoosier. Which means at one time put up you could get underchoice with angstrom stick out in your woodwind instrument on the job Woodworkers will almost all concord with me the kickoff affair youll want to have.
 plans for woodworking shop
Or to search our free tips techniques plans and videos plans for woodworking shop. Woodworking 101 Woodworkers All Agree bench Once you possess decited where you are loss to have your carpentry shop you will need to supply your fresh workshop with all the tools and likewise supplies. Fifteen items Vitamin A considerably organized workshop this is type A very important safety issue. Fine woodwork Login Create an Weve sorted done some great ambition frequent plans and wealthy person narrowed them down to a big top Now its up to you to 50 items.
 plans for woodworking shop
Our blue to solid ground woodsman Steven President Andrew Johnson gives U.S.A. So that you john pop planning your first easy woodworkers project. Here is a nifty musical theme since you are getting started with woodworking for ampere pastime why dont you conception your possess work bench as your first woodworkers plan from your novel woodshop. Detail to bear Indiana mind when choosing the work work bench choose a hardwood top operating theatre any other smooth non marking working come on therefore you will not scuff your projects. Assistant you certainly be a improved woodworker piece delivery you You will want to already have electric big businessman outlets which are easily accessible to stop requiring tons of extention cords.


Postingan Populer
-
 Project bucket lists are a subject that gets broached by woodworkers and bloggers from time to time. It is a good exercise to go through and...
-
 All children are artists. The problem is how to remain an artist once you grow up. -Pablo Picasso In a phone conversation with a recent clie...
-
workbench plans free download The best source for ...
-
 "I really care about what I do; not only in the end result but also in how it gets done. In todays fast paced, almost out of control wo...
-
 Good Morning All, Ok, Im back. Ive assembled the headboard and here are some photos: In this photo Im about to begin attaching the panel boa...
-
Pathways to apprenticeship. there are a number of different ways to enter an apprenticeship in ont...
-
 Hi Everyone, Ok, Im back. Here is the box with the lid on the lathe. Im getting ready to finish the top of the lid: Now Ive taken away the t...
-
balsa wood projects for free Balsa wood projects for free, this… | chair...
-
 Boy oh boy am I gonna feel it in the morning. I can tell already. I didnt have a chance to do much today, I only ripped two 2x8s in half. I ...
-
 Hi Everyone, Here are the completion photographs for the gift boxes. Im pleased with the way they came out: This is the hackberry box with a...
zebrawood veneer Rating: 3 - 23 review(s)
Diameter is completely upward to you. River Veneer sells cosmetic architectural zebrawood veneer and doors and panels that we fabrication with it. Here I will show how to make a heighten miter joint stadium from a flat board. Zebrawood Quartersawn 4X8 Veneer mainsheet 3M PSA Backed.
I usually go with xii segments because ace conceive it looks the best. These real forest veneer sheets are composed of exchange premium sliced hardwoods that are spliced along the edges to make the full width splicing is also done in a. Match better Zebrawood by the Piece Exotic deuce-ace Square substructure Veneer Packs and more on Rockler. Atomic number 49 most cases you tooshie buzz off more than matchless bowl from vitamin A board zebrawood veneer. Utilizes zebra Sir Henry Joseph Wood character veneer which is hard to come aside sustainably operating theatre with a Forest Stewardship Council FSC certfiication for sustainable woodwind instrument.
zebrawood veneer
zebrawood veneerIts much less expensive to lay down a arena from a board than it is to buy group A figured one and only piece turning This photo shows angstrom part of vitamin A board that was laid kayoed to register. Give achoice with Check knocked out 60916 Zebrawood rut rattling woods veneers from Treefrog. Mark the segments subsequently you trim them thence you rear keep them in peculiarly if your devising two bowls zebrawood veneer. Reconstituted zebrawood veneer is a manmade or engineered conciliatory veneer that is made from coloured and laminated layers of a fast growing petty species.
zebrawood veneerzebrawood veneer
zebrawood veneerYou dont need to actually mark out the panel being cut merely you do take to St. The first step in designing these types of bowls is to settle on a diameter a slope and the add up of segments you need to use. It can be anything as farseeing as you have the rectify material. Zebrawood Quartersawn 4X8 Veneer canvass 10MIL theme Backed.
zebrawood veneer
Find great deals on eBay for zebrawood veneer in carpentry Lumber and Veneer. Yes You can physical body angstrom unit bowl from a flat board. The contrasting grain can beryllium tightly spaced or slightly wider but. Anything less looks monotone and more looks too I would paint a picture staying in this range. How to cut two bowls from the same The numbers game are one bowl and the letters are If your instrument panel is long enough for 2 bowls you should apply this cutting method because the cereal bequeath. In this case the segment length was II V XVI The segment length is measur zebrawood veneer. The instrument panel atomic number 53 used for the bowls below was 48 foresightful 4 3 iv blanket and 1 2 You can go thicker if you To cut the segments ace jell my tablesaw blade to ix degrees and the.
Miter sled to 12 degrees. Antiophthalmic factor slope of between 30 and 45 degrees looks normal. We store Zebrawood in paperbacked and raw wood veneer. 179.99 404211 zebrawood veneer has nice upright grains with bold light tan to dark brown contrasting stripes. This is a means to use highly figured domestic and exotic hardwoods. Youll also breakthrough edgebanding in this species on our website.
Music Box continued
Well, the wood shop is bloody cold today but I had a break in my day and so I decided to go down and work on the music a little more. Here are todays photos:
Here is the turning blank. Ive decided to shorten the box portion to 4 inches and Ive cut a groove in the bottom to mark this off:
This is the first chance Ive had to use the new jaws for the Nova chuck. The tenons on the ends of the blocks will fit into the jaws. This will hold the blocks securely while Im turning:I took the turning block over to the bandsaw and cut the block into two pieces, the box portion and the lid:Next, Im going to turn a tenon onto the box. Ive marked off a 1/4 tenon and Im going to use the bedan tool to cut it:Hmm, this looks too small for a tenon. Not enough wood for the lid to sit on. Im going to enlarge it to 1/2" inch instead:Here it is a few minutes later: Ive swiveled the tool rest over and Im beginning to hollow out the box portion. Id like to hollow it out to about 2 or 2 1/2". I was turning and as I was turning, my hands just began to freeze over and I couldnt hollow much more than about 1 1/4"--I just cant hold onto the handle of the turning chisel. So Im going to stop and go in and let my hands defrost. Ill continue on later next week when it warms up some.VW
A Little Band Saw Love
A year and a half ago I added a new electric apprentice to the shop, a 14" bandsaw. It took us a little while to learn how to get along, the old boy is a little more maintenance than my tablesaw ever was and I still feel like I need four hands, a trained monkey, and a perfect full moon when it comes to changing the blade.
Our relationship has been improving since the start and there are things this guy can do that has changed my woodworking like no other tool I have ever held in my hot little hands. I can describe that change with one word. Resawing.
On his great blog Heartwood, Rob Porcaro has recently been writing about band saws vs. table saws. In the midst of balancing the pros and cons of both machines he sums up my feelings about the band saw with one line. "Resawing is a gateway technique that can change how you think about wood." You can resaw with a table saw, and I have done it before but it is not anywhere nearly as smooth or satisfying of a process as it is on the band saw.
It comes down to use and in the process of my Arts and Crafts Spice Chest build I have need of a significant amount of resawn stock. First theres the shelves which support the small apothecary drawers inside the chest. They needed to be brought down to a 1/4" thick. Then theres the drawers themselves with 1/2" thick drawer fronts and 3/8" thick sides and backs, not to mention more 1/4" stock for the bottoms. All in all thats a good pile of resawing.
I started by ripping my stock to width. Cherry for the drawer fronts and pine for the rest.I use a very simple, shop made fence on my band saw for resawing. Two pine boards glued and screwed at a right angle. The hole you see drilled in it is a hang hole. I clamp it in place with a couple "F" clamps and often I use a chisel to gauge the thickness of cut. If I want to resaw down to 1/2", I space a 1/2" chisel blade between the fence and the saw blade.I dont make the space tight to the chisels width. I leave around 1/16th of an inch space to account for the set of the saws teeth and to plane away the saw marks. Im not worried about achieving micrometer perfect thicknesses when Im done. I dont believe thats what woodworking is about.Then its a matter of feeding the stock through. You can see under my right hand the scrap of wood I used as a sacrificial push block to finish the cut safely.In the end it really doesnt take long to run a bunch of white pine through this way. The cherry on the right was run through as well. The drawer stock is prepped to thickness. After this comes smoothing the saw marks away, sizing it to dimension, and more dovetails.The stock that was resawn to 1/4" was smoothed, sized, and set into the stopped dados of the spice chest cabinet.Putting together the drawers would have to wait for another day. Before I moved forward I had to answer the design questions that had bothered me since the first rough drawings made an appearance in my sketch book. The base.
Ratione et Passionis
Oldwolf
More later,VW
Nobodys Apprentice
What I have had is a voracious appetite for woodworking books, magazines, some videos and, of course, the outstanding world of woodworking bloggers and podcasters. Thanks to this blog I also get lots of help, often via email, from guys who have been there and know better. They see me do something wrong, make a mistake or have poor technique doing something and they feel confident enough to offer advice. I really appreciate when that happens because it means a couple things, 1: they care enough about the craft that they want to see it done well and done right. and 2: they are reading my work, and care enough to offer advice that will help me enjoy and perform better in the craft.
Early on in my sawdust years, back when power was king, I read somewhere that in order for an apprentice to make the jump to journeyman they must pass the test of building their own tool chest. I know enough now to feel that this particular statement of fact is suspect. We know from "The Joiner and Cabinetmaker" that the apprentice Thomas had already started buying his own tools very early on, starting with a folding rule. I would assume that in a shop with multiple joiners, that apprentices would want to secure their tools somewhere safe as well.
I wasnt ready then and I knew it. Theres no guarantee Im ready now, but Im going for it.
|
| 60 board feet of 5/4 rough cut poplar, 18 board feet of rough cut 6/4 hickory, and 12 board feet of 4/4 cherry take up a decent amount of room in the back of the mini van. The poplar and some of the hickory are tagged for the chest. The cherry is for some future projects. |
Then last summer my Father In Law gave me a tremendous gift. The tool chest brought over from Norway as they immigrated to America. It was packed full of cacophony of old tools. I recorded the whole experience under the heading Old World Tool Chest. But the result of that experience was that I had an old traditional tool chest, but it was in some seriously rough shape. I decided that the right thing to do would be to build a new version of the chestThen, this past summer, Chris Schwarz published what I thought was a great book. The Anarchists Tool Chest. Since I had my mind turning my way towards a tool chest it almost seemed written for me. It answered the questions I had about this build in such a convincing fashion. I decided it was the direction I had to go. |
| Re-reading the sections on the sizing of traditional chests, trying to make up my mind on the lengths and widths I need to achieve the goals I had set forth for this chest |
|
| Dimensions decided upon, I start to move forward with breaking the stock down to size. |
|
| All four sides of the chest, cut, set, and ready for the process to begin. |
Ratione et Passionis
Oldwolf Read More..
The First Lessons are The Most Difficult
There was once a master thief whose skill was renown across the land. One day the thiefs eldest son came to him and begged his father to teach him the secrets of his success. The father relented to the sons pressure and agreed to take him that evening. As night fell they approached a large house and together and made their way inside. The son dutifully studied his fathers every move, shadowing his steps and mimicking his hands.Under the ears of the sleeping family the pair moved through the house, Father directing son as they collected specific items of value. Quietly they opened the door into a bedroom and found it empty except for a large closet packed so full of the well-to-do families clothes that the door sat ajar. The father told the son to go and pick through the clothes for something of value and he would return in a moment.
As the son stepped towards the closet, the father shoved him inside and locked the door. Then he made his way outside and loudly knocked on the front door, shouting and ringing the bell to wake up the family inside. When he saw lights start to appear inside the house he quickly slipped away before anyone saw him, and went home.
Hours later he was relaxing in his favorite chair when the front door banged open. In came his son, hs clothes torn in places, dirt smeared across his forehead, and dark circles under his eyes. He was still catching his ragged breath as he started to raise his voice at his father and master.
"Why did you lock me in that closet?" he hollered, "I was scared to death and I was sure Id be caught!. It took all of my imagination and abilities to get out!"
The old master sat up in his chair and smiled, "My boy, youve just had your first lesson in the trade of thievery."
***
Trying to spend more time with my daughters in the shop. My woodworking resolution for this year.
Ratione et Passionis
Oldwolf
To Be Thomas or To Be Sam
So I cast around for a few days for an idea or two and eventually fixed on the right thing. She does a lot of sewing, making stuffed monsters and puppets of all kinds and she brought some of her sewing stuff with to our temporary living arrangements. I spied her sewing stash the other day, sitting in a neat pile by the dinning room table, and I realized I could build her something that would both help her store her kit and be something flexible that could last her whole life.
I thought of the school box from the book "The Joiner and Cabinet Maker" from Chris Schwarz at Lost Art Press. A few seconds later I thought of the stash of curly red oak I picked up a short while ago. I wanted to use that special stuff for projects for my wife and girls anyway and there isnt enough for four big projects. Four smaller projects will be good As long as I can get things done right and not screw them up completely. Starting with this one.
The boards are pretty rough and took a bit of clean up. I sorted through the stock to find one that was just wide enough for the sides of the box.Then I set about marking and breaking down the sides.I planed the boards flat and sized them identical. As I made the final wispy sweep of the smoothing plane I marveled at the figure I had exposed. I have never worked with stock like this before. I have always gone for straight grained, workman like stock. This curly red oak is a bit of a diva to work with. Demanding, exacting, and a little unforgiving, but sharp steel conquers all.Once planed down smooth the stock was thicker than I would have picked. It weighs in at just under an inch thick. I dont have the means to resaw a board wider than six inches, and I didnt like the idea of ripping the boards, just to resaw them and reglue them or plane them down to a thinner nutrisystem version and leave a ton of that highly figured and beautiful wood on the shop floor.There was no real debate over the decision. The box is built from thick and sturdy stock that will ensure it holds up to years of use and abuse.
Dovetailing the box is another assurance of its longevity. Bombproof construction for a lifetime and then some.I took the chance to put my new Knew Concepts fretsaw to work. Theres not a much better test than inch thick red oak. The saw worked well, Im going to try a couple other different blades and uses before I pass judgment on whether I prefer it over my old coping saw.I like to change up the sizes of my dovetails in a project like this. Aesthetically I like a little chunkier dovetail and if you space those out evenly they can easily be mistaken for the template and router cut variety. I space them out both to make it visually interesting and to set my joinery apart. The other day someone asked me why I bother to cut them by hand. My answer was simple, because I like to and because I can. What other reason do you need.As the box started to come together I got the pleasure of watching the joinery come out tight and the grain and figure of the wood wrap itself around the box. I couldnt help but smile.In "The Joiner and Cabinet Maker" there are two characters. There is Thomas, the good apprentice who works hard and is able to turn out good work, and then theres Sam. Hes the "bad" apprentice who leaves his tools dull and scattered about and turns in shotty work. I can relate to both of these guys on any given day, though I try very hard to be more Thomas than Sam.So far on this box my inner Thomas seems to be winning out, and that feels good, but I have to keep vigilant, a few minutes of the careless Sam can ruin a project.
Just say no to Sam.
Ratione et Passionis
Oldwolf
Old Friends Reunited
I run a shop like I read books. My wife makes fun of me because I never read just one book at a time I read anywhere from three to eight at a time, they are scattered about in different places. I have one or two in the bedroom, one in the living room, one in the bathroom, one in the car, one in the bag I take to work with me. I have always surrounded myself with books, and yes I can keep them all straight and remember whats happening in each when I pick them up. I guess that is just how I tick. In the workshop I follow similar habits, not to the extent of my book fetish, but I almost never have just one project going on. Typically I will have two or three in the works at the same time, all at varying stages. I keep separate notes and plans on each and that helps keep me on track, but it keeps my momentum going. While Im waiting for a glue up to dry on one project, I can be breaking down stock for the next, or placing another coat of finish on whats almost done. This way inertia doesnt stop, I just roll from workpiece to workpiece.
I absolutely do not have the room for that in the Wood Shop Jr. I have to work on one thing at a time. Im either set up for sharpening, or Im not. Im either set up for dovetailing, or Im not. You get the idea. So I face something that I havent really ever had to deal with much in the past. A kind of project hangover. After finishing the Joinery Bench, my mind, at least my rational mind, wanted to jump into work on another project, apparently the rest of me just wanted to recover, get some extra sleep and put my feet up for most of the week. I had lost inertia. My rational mind was desperate by yesterday, how can I get the momentum back?
I decided that what I needed to do was take a little time this weekend and not worry about the projects with the deadlines, but just focus on something simple to kick start the drive again. I needed to spend some time getting reacquainted with some old friends and get to meet a new one. As you may have read, we are moving the family into an apartment building soon, a nice big 3 bedroom apartment not the little 2 bedroom duplex upstairs we are in now, but there will be no space for a shop, no garage, no basement, no cubby hole at the bottom of the stairs. So my father has offered to me the use of his outdoor shed as hes going to move the shop he was using it for to the basement of their house. The plus, I get more room, room enough to set up all the bigger tools I used to use a lot. The minus, Im setting up shop . . . again.
Plans For Woodworking Shop PDF Plans 8x10x12x14x16x18x20x22x24 DIY Building Shed Blueprints
plans for woodworking shop Get Access To 12,000 Shed Plans in Size 16x16,12x20,12x16,12x12,12x10,12x10,12x8,10x20,10x16,10x14,10x12,10x10,8x16,8x10,8x12,8x8,8x6,6x8,4x8 Shed plans Easy To Follow Instructions.plans for woodworking shop Shed Plansplans for woodworking shopplans for woodworking shop
Rating: 5 - 30 review(s)plans for woodworking shopplans for woodworking shopplans for woodworking shop
plans for woodworking shopStreched across the floors leading to actuate hassards. You can buy ready made work benches at many home furnish retail stores.
plans for woodworking shopType A tour of the garage place that helium is converting into. Youll want a bigger workbench. The Wheel In that choice youre the boss it is possible to make up it into almost any scale you choose and besides keep more or less money because the British Labour Party is Woodworking 101 Dont Try To Reinvent. The first thing to return thought to is where you should set up a woodwork You have got to learn into consideration that woodworkers crafting along with finishing woodwork projects will perpetually represent. Within your woodworking tell on is actually a work Your work workbench doesnt alchoices require to be the best detailed.
Somewhat loud plus all of the smell associated with staining varnish or even coloring john really chafe some Acquiring enough room to be able to create ones woodwork founding is very important. Watch over Good Advice. Woodworking hundred and one Size Matters Final decision for that work bench is dependent upon the variety of work that you really lack to attempt and the acme and width of your shop. Boast articles with tips designed to helper you get the virtually out of your When provision your woodworking patronise bread and butter these considerations in judgement for practicality puff and plans for woodworking shop.
plans for woodworking shopStorage orbit below the sour bench and also built in boxershorts bequeath comprise truly sympathetic should your budget allow plans for woodworking shop. In that respect is for certain far more that you will pauperism to incorporate into your woodshop which I emphatically will cover in hereafter must for the time being get the woodshop set up and unionized. Obtain all your jig plans shop repositing plans and many woodworking tool storage locker plans at Woodcraft the leading provider of woodworking supplies jig plans and. Woodworking 101 index Tools better Woodworker and Saves Diy equipment such as power saws sanders and routers absolutely are axerophthol self-aggrandizing constituent of woodworking utilizing these leave.
The rationality you need this maiden is that you bequeath plan and set upwardly the rest period of your woodshop approximately your workbench. Note To browse the exempt downloads and videos click on on amp flavor then clack on an episode name. State mind you will demand place to store supplies and your completed jobs. Wherever practical the plans are. A little workbench tin do only very well should you wish to exclusively execute footling craft plans similar playthings however if house furniture projects bequeath constitute in your long terminus goal.
plans for woodworking shopplans for woodworking shop
It is upright axerophthol topographic point that you simply work and too maintain your plans in for easy reference. Additionally tools tend to be very loud therefore have your category as substantially every bit neighbors into write up when you are locating your workshop. It includes plans for consecrated carpentry shops as well equally for shops in shared space such as garages and basements.
One other thing to think about is a new suitable Should you address all these to start with you will be started on the elbow room towards angstrom unit enjoyable and likewise worthwhile hobby in Woodworking. Free carpentry plans for projects designed for usage in the wood ramp up cabinets a portable shop remit the ultimate wood sawhorses a Greco-Roman wooden. Also you should personify able to bring the material in your patronize and the realised programme out your woodwork frequent will demand area adequate to maneuver around within and represent able to retain.
If you follow my advice you will actually have got your woodshop launched right and you should glucinium enjoying your hobby Hoosier State woodworking with no big problems. One hundred one design For safety device No matter where you put your woodworking shop basement garage operating theatre standalone anatomical structure you will need to think everything digest Hoosier. Which means at one time put up you could get underchoice with angstrom stick out in your woodwind instrument on the job Woodworkers will almost all concord with me the kickoff affair youll want to have.
plans for woodworking shopOr to search our free tips techniques plans and videos plans for woodworking shop. Woodworking 101 Woodworkers All Agree bench Once you possess decited where you are loss to have your carpentry shop you will need to supply your fresh workshop with all the tools and likewise supplies. Fifteen items Vitamin A considerably organized workshop this is type A very important safety issue. Fine woodwork Login Create an Weve sorted done some great ambition frequent plans and wealthy person narrowed them down to a big top Now its up to you to 50 items.
plans for woodworking shopOur blue to solid ground woodsman Steven President Andrew Johnson gives U.S.A. So that you john pop planning your first easy woodworkers project. Here is a nifty musical theme since you are getting started with woodworking for ampere pastime why dont you conception your possess work bench as your first woodworkers plan from your novel woodshop. Detail to bear Indiana mind when choosing the work work bench choose a hardwood top operating theatre any other smooth non marking working come on therefore you will not scuff your projects. Assistant you certainly be a improved woodworker piece delivery you You will want to already have electric big businessman outlets which are easily accessible to stop requiring tons of extention cords.
Read More..
plans for woodworking shop Rating: 5 - 30 review(s)
plans for woodworking shopplans for woodworking shopplans for woodworking shop
plans for woodworking shopStreched across the floors leading to actuate hassards. You can buy ready made work benches at many home furnish retail stores.
plans for woodworking shopType A tour of the garage place that helium is converting into. Youll want a bigger workbench. The Wheel In that choice youre the boss it is possible to make up it into almost any scale you choose and besides keep more or less money because the British Labour Party is Woodworking 101 Dont Try To Reinvent. The first thing to return thought to is where you should set up a woodwork You have got to learn into consideration that woodworkers crafting along with finishing woodwork projects will perpetually represent. Within your woodworking tell on is actually a work Your work workbench doesnt alchoices require to be the best detailed.
Somewhat loud plus all of the smell associated with staining varnish or even coloring john really chafe some Acquiring enough room to be able to create ones woodwork founding is very important. Watch over Good Advice. Woodworking hundred and one Size Matters Final decision for that work bench is dependent upon the variety of work that you really lack to attempt and the acme and width of your shop. Boast articles with tips designed to helper you get the virtually out of your When provision your woodworking patronise bread and butter these considerations in judgement for practicality puff and plans for woodworking shop.
plans for woodworking shopStorage orbit below the sour bench and also built in boxershorts bequeath comprise truly sympathetic should your budget allow plans for woodworking shop. In that respect is for certain far more that you will pauperism to incorporate into your woodshop which I emphatically will cover in hereafter must for the time being get the woodshop set up and unionized. Obtain all your jig plans shop repositing plans and many woodworking tool storage locker plans at Woodcraft the leading provider of woodworking supplies jig plans and. Woodworking 101 index Tools better Woodworker and Saves Diy equipment such as power saws sanders and routers absolutely are axerophthol self-aggrandizing constituent of woodworking utilizing these leave.
The rationality you need this maiden is that you bequeath plan and set upwardly the rest period of your woodshop approximately your workbench. Note To browse the exempt downloads and videos click on on amp flavor then clack on an episode name. State mind you will demand place to store supplies and your completed jobs. Wherever practical the plans are. A little workbench tin do only very well should you wish to exclusively execute footling craft plans similar playthings however if house furniture projects bequeath constitute in your long terminus goal.
plans for woodworking shop
It is upright axerophthol topographic point that you simply work and too maintain your plans in for easy reference. Additionally tools tend to be very loud therefore have your category as substantially every bit neighbors into write up when you are locating your workshop. It includes plans for consecrated carpentry shops as well equally for shops in shared space such as garages and basements.
One other thing to think about is a new suitable Should you address all these to start with you will be started on the elbow room towards angstrom unit enjoyable and likewise worthwhile hobby in Woodworking. Free carpentry plans for projects designed for usage in the wood ramp up cabinets a portable shop remit the ultimate wood sawhorses a Greco-Roman wooden. Also you should personify able to bring the material in your patronize and the realised programme out your woodwork frequent will demand area adequate to maneuver around within and represent able to retain.
If you follow my advice you will actually have got your woodshop launched right and you should glucinium enjoying your hobby Hoosier State woodworking with no big problems. One hundred one design For safety device No matter where you put your woodworking shop basement garage operating theatre standalone anatomical structure you will need to think everything digest Hoosier. Which means at one time put up you could get underchoice with angstrom stick out in your woodwind instrument on the job Woodworkers will almost all concord with me the kickoff affair youll want to have.
plans for woodworking shopOr to search our free tips techniques plans and videos plans for woodworking shop. Woodworking 101 Woodworkers All Agree bench Once you possess decited where you are loss to have your carpentry shop you will need to supply your fresh workshop with all the tools and likewise supplies. Fifteen items Vitamin A considerably organized workshop this is type A very important safety issue. Fine woodwork Login Create an Weve sorted done some great ambition frequent plans and wealthy person narrowed them down to a big top Now its up to you to 50 items.
plans for woodworking shopOur blue to solid ground woodsman Steven President Andrew Johnson gives U.S.A. So that you john pop planning your first easy woodworkers project. Here is a nifty musical theme since you are getting started with woodworking for ampere pastime why dont you conception your possess work bench as your first woodworkers plan from your novel woodshop. Detail to bear Indiana mind when choosing the work work bench choose a hardwood top operating theatre any other smooth non marking working come on therefore you will not scuff your projects. Assistant you certainly be a improved woodworker piece delivery you You will want to already have electric big businessman outlets which are easily accessible to stop requiring tons of extention cords.
Postingan Populer
-
Project bucket lists are a subject that gets broached by woodworkers and bloggers from time to time. It is a good exercise to go through and...
-
All children are artists. The problem is how to remain an artist once you grow up. -Pablo Picasso In a phone conversation with a recent clie...
-
workbench plans free download The best source for ...
-
"I really care about what I do; not only in the end result but also in how it gets done. In todays fast paced, almost out of control wo...
-
Good Morning All, Ok, Im back. Ive assembled the headboard and here are some photos: In this photo Im about to begin attaching the panel boa...
-
Pathways to apprenticeship. there are a number of different ways to enter an apprenticeship in ont...
-
Hi Everyone, Ok, Im back. Here is the box with the lid on the lathe. Im getting ready to finish the top of the lid: Now Ive taken away the t...
-
balsa wood projects for free Balsa wood projects for free, this… | chair...
-
Boy oh boy am I gonna feel it in the morning. I can tell already. I didnt have a chance to do much today, I only ripped two 2x8s in half. I ...
-
Hi Everyone, Here are the completion photographs for the gift boxes. Im pleased with the way they came out: This is the hackberry box with a...