 I had a piece of 1/2" thick red oak rolling around the shop and that seemed like it would do the job nicely. I took the old saw bed and used it to get the proper width.
 A few seconds with a rip handsaw and a little plane to the edge and I was down. I then laid out the bed on the miter box to get the correct length and cut that with a carcass saw and a bench hook.
 I dont think the originals had dressed up corners, but one of the other restorations I saw out there had them and I liked them, so why not?
 I sawed out the space and hit the edges with a rasp until I had refined the shape I was looking for.
 I guess you couldnt tell Ive recently finished reading "Greene & Greene Furniture: Poems of Wood and Light" by David Mathias. The corners look a little cloud liftish to me. I kind of like them.
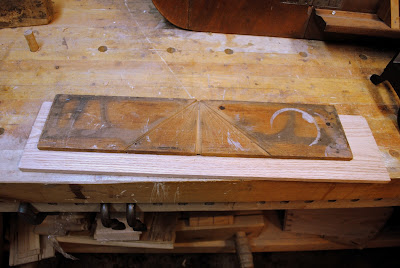
 One of the missing parts I have to fabricate is a pair of "L" brackets that ride in a couple grooves in the saw bed. They help hold the stock youre sawing in place against the back and forth of the saws motion. I hadnt made the pieces yet but I knew they would be 1/2" wide and the bed section would be 1/8" thick. I marked their placement out and cut down the sidewalls with my carcass saw.
 Then I cleaned up the groove with a chisel and a router plane.
 All that was left was to place a little finish on the board and screw it back into place
.JPG) Im pretty happy with the end result. Soon Ill have the other parts finished and the miter saw will be good as new and pulling its weight in my shop.
Im pretty happy with the end result. Soon Ill have the other parts finished and the miter saw will be good as new and pulling its weight in my shop.Ratione et Passionis
Oldwolf


Postingan Populer
-
 Project bucket lists are a subject that gets broached by woodworkers and bloggers from time to time. It is a good exercise to go through and...
 -
 All children are artists. The problem is how to remain an artist once you grow up. -Pablo Picasso In a phone conversation with a recent clie...
 -
workbench plans free download The best source for ...
-
 "I really care about what I do; not only in the end result but also in how it gets done. In todays fast paced, almost out of control wo...
 -
 Good Morning All, Ok, Im back. Ive assembled the headboard and here are some photos: In this photo Im about to begin attaching the panel boa...
 -
Pathways to apprenticeship. there are a number of different ways to enter an apprenticeship in ont...
-
 Hi Everyone, Ok, Im back. Here is the box with the lid on the lathe. Im getting ready to finish the top of the lid: Now Ive taken away the t...
 -
balsa wood projects for free Balsa wood projects for free, this… | chair...
-
 Boy oh boy am I gonna feel it in the morning. I can tell already. I didnt have a chance to do much today, I only ripped two 2x8s in half. I ...
 -
 Hi Everyone, Here are the completion photographs for the gift boxes. Im pleased with the way they came out: This is the hackberry box with a...
0 komentar:
Posting Komentar