Senin, 25 April 2016
Sizing With Sectors For Style
I made up my mind to build something for the new shop. A little premature maybe, there will be other things to build too once I get there, but I had a hankering to make something. I wasnt sure what. Then I picked up the latest issue of Popular Woodworking Magazine. Packaged along with the main publication was a thinner "shop projects" pamphlet.
The first project was a tool rack built by Chris Schwarz. "Oh boy," I thought, "Im gonna end up building one more thing from the Schwarz Collection." (What else is a Fan Boy to do?) And I m fine with that. I remembered reading about the piece in the "I Can Do That" section of PW the first time they published it. I appreciated it then, but gave it a pass. This time around it just felt like the right thing to build.
 |
| A picture of the original tool rack borrowed from the PW website. |
I could envision the right place for this piece in the new shop. I plan to hang it over one of the windows so the light comes through the back opening. As I thought about really building this piece more I started to have some ideas of my own.
The original article used pocket screws and simple joinery. Again, it was an "I can do that" article, so it was meant for entry level woodworkers. I planned to upgrade the joinery not because what was done was bad, but because I could, and I enjoy the joinery part of building. But that was simple. There was one other part of the design I struggled with.
 |
| A layout of the sides, This picture also borrowed from the PW web site. |


 Then I set the smaller sector on the page and line up the markings from two of the same number to bracket the outer corners of the drawing. It doesnt matter which of the 13 numbers I line up, I chose 10 at a whim. The perspective of the photo makes it look funny but the outer corners of the drawing are in line with the inner lines of the 10.
 Then I take the measurement I locked on my small dividers and find where it measures out on the sector. The tips fell just inside the lines for the number 1.
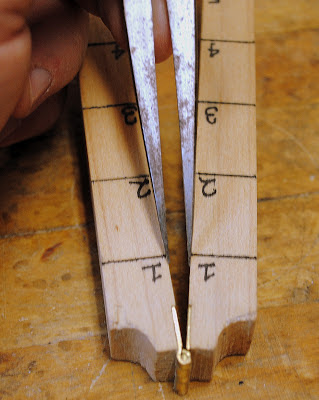 Now I take my larger sector and set it up with the stock. Since I chose to use the number 10 on the smaller, I repeated that on the larger. I also made sure to take into account the amount of board that would disappear into the eventual dado joint.
 Once I had the larger sector set and stable, I took my larger dividers and repeated the reading I took with the smaller, just a little inside the number 1s lines. Since everything is spaced out equally on the sectors, the spacing will be proportionally identical, within a slight factor of human error. This isnt a C&C machine Im running and a few millimeters matters little when its the over all look Im after. In the end it will look right or it wont and that will be the ultimate determination of success.
 Then I use the new set dividers to transfer the spacing to the board. repeat the action over for the other measurements and youll work out the spacing and pattern. I drew the curves between the hard line elements freehand, but mostly because it was quicker. You could use the same method to plot out a few points to follow if you need to. I suggest trusting your eyes and instincts though.
 With the lines all set down in pencil I went back over where I wanted the hard line to fall with a sharpie so it would stand out across the room. I also shaded in the space to be removed to help from a distance.
 I picked up the book, and from across the room held the image out at arms length and judged the job I had done.
 I ended up a little narrow in the top, front of the board to back, but the shape was there and it was pleasing to my eye from a distance. I decided to keep it.
 I hope I explained how I made the process work well enough. If not I may consider shooting a video to help explain, however I dont want to step on Jim Toplin and George Walkers toes as I suspect sectors may be something well covered in their new book "By Hand & Eye" from Lost Art Press. Ive ordered my copy and I cannot wait to read it. You may want to consider it too.


0 komentar:
Posting Komentar