It has been over a month since I have had the time, opportunity, or energy to step into the shop. Life gets in the way in funny ways sometimes, but today I made it back and I even had a plan for what I wanted to work on. I will continue on with the tall case clock soon, but for now I am just happy to be making sawdust again. I have a storage problem in the shop that Ive been searching for a while to answer. You see my sandpaper storage looks like this:
For a couple of years now, whenever I think about it, I have looked for ideas for storage solutions, Ive seen a variety of shelves, individual boxes, ones that sit on shelves, ones that hang on walls, ones made completely from scratch, and ones using plastic boxes purchased from Wal Mart. They all seem to work fine for their owners, but none of them look like something I would be happy with. So I stay with my little, too small, blue bin, and swear and sigh on the occasions I need to go fishing for a piece. Recently I had to buy a full 4x8 sheet of 1/2" plywood for only about 10" of its width. I dont use plywood often in projects so I dont have a good storage solution for that either. That means I have spent a good amount of time moving it back and forth from one side of the shop to the other, yet again sighing and swearing. Well the one thing I have had time for on my shop sabbatical is thinking. Thinking and sketching and planing. I decided I would kill 2 storage solutions with one fell swoop. I would use up the plywood making a sandpaper storage center. So I searched again for new ideas, I asked those who follow my on Twitter for ideas and I found several that were OK, but none that seemed right for me and my shop. A while back my wife and I went to a flea market and I saw an old tool box that was labeled as a blacksmiths tool box. It was completely enclosed with a slanted door. Inside there were several different partitions and this intrigued me at the time but I just filed it away in my mind but now it came to my mind again and I decided to use that idea. Here are the pieces for the main carcass, I cut everything down to size using my trusty table saw, there was no point in dulling the hell out of my handsaws on plywood.
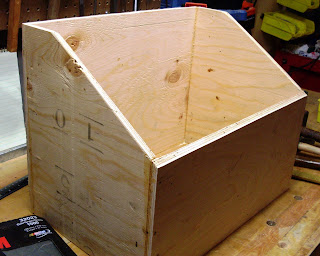
No fancy joinery, similar to the utilitarian packing box built in "The Joiner and Cabinet Maker" just some glue, butt joints, and finishing nails. I know what your thinking, that is so unlike me. The box itself measures 18" wide and 12" deep, it is 14" tall in the back and slopes down to 9" in the front.
With the basic case assembled I took up a plane and went to planing an angle on the front board to match the slope of the sides in preparation for the lid.
Now the consideration became, if I have to move this about at times, how can I make that easier. So I made to fashion a couple of simple handles for the sides. I started with a couple of 1 1/2 square sections of pine. and I marked out the areas to recess for a grip.
Using a chisel, a gouge, some rasps and a small block plane. I shaped the handle. Once it was done I started on the other.
I measured and drilled some pilot holes in the box. add a little glue and a couple drywall screws and the handles seemed to fit very nice.
Now it was time to plan to fill the partitions inside the box. I cut some more plywood to begin to create those. I use 4 kinds of sandpaper typically, I keep belts for the belt sander and 5 inch disk for a random orbit sander. I keep triangle shaped sheets for a mouse / detail sander. but the thing I keep the most of is a variety of sheets of fine wet/dry paper for sharpening chisels and plane blades. I started with the sections to separate the full sheets.
I cut a shallow swoop into seven of the eight sections using my coping saw. I know I could have done it on the band saw or with a jig saw, but often I just find it easier to grab a hand saw and make the cut. It really takes less effort than most people think once you take the time to develop some technique.
I set each partition with a 1/2" space inbetween each. They got glued into place and nailed with a couple of finishing nails.
I got all the sheet partitions in and built the partitions for the sanding belts and decided to call it a night in the shop. I actually get some shop time tomorrow as well. Two days in a row after such a long drought, I could get used to this.


0 komentar:
Posting Komentar