Well shes done, and hanging, and dutifully and lovingly cradling my saws in her pine bosom, right next to her heartwood. . . ahhemmm sorry about that.
So here we go with my follow up on the project. Today I rubbed the finish into the drawer, put the whole thing together, took some pictures and hung it on the wall. If you havent seen the rest of this build you can find all the posts on the saw till build gathered under this link (CLICK HERE)
 In the end I like to look back and try and figure out what I did and what I could do better. This piece is simple and straight forward theres not a whole lot for me to mess up but I am worried about one thing showing in the future. Its the back, I built it using 3" wide and 1/4" pine boards, all fit and cut individually to fit and numbered in order, but I did not edge glue these pieces together when installing them. I pre-finished them and ran a bead of hide glue along the surfaces they would come in contact with on the case, and I placed a finish nail at every level, so those boards will stay in place, they will not come out. But what I forsee them doing over time is drying out a bit and shrinking some and this will give show some small gaps between the boards over time. In the end this doesnt really bother me at all, this is a shop appliance, but if I were to build one of these for someone else I would probably take the extra step and either ship lap the boards or at the least edge glue them...
 I think the drawer and the dovetails on this piece turned out excellent. I almost wish I had done some type of dovetailing for the cross piece that runs horizontal just above the drawer. I worry sometimes I get a little obsessed with cutting dovetails, but I enjoy doing that so much.
 I really like how the saw till does its job completely to my specs. All my saws have a home, there is room for future acquisitions, (Ive started hinting about Bad Axe Tool Works and Christmas already) I really like that it holds my saw vise and gets it out of sitting in a cabinet or under my workbench. I was always a little paranoid about doing something to make it hit the floor of the shop and seeing the cast iron crack. Now my paranoia is put to rest. (At least in this case)
I experimented a bit with a new type of finish. This was actually the first time I did any mixing of finishes. Around the time I was starting this project I read an old article by Sam Maloof about shaping the arms of chairs. In it he also mentioned the three part finish he liked to use. So I started to do a little research into this specific finish and found several versions and recipes out there. I didnt follow one specific recipe from anyone I went to the store to find the most availible products that were in approximation to what Mr. Maloof mentioned. This is what I settled on.
 Tung Oil, Wipe on Poly, and some good old Boiled Linseed Oil. I mixed equal parts of all three and I have to say I am a little hot and cold on my results but I have a theory. I relate it to the wood. The finish had a wonderful feel to it, very satiny and smooth, but with the pine it brought out the grain and made it pop but I wished I had done something to add some color to the wood. But, today when I pulled the can out to rub the finish on the drawer I used a small piece of white oak scrap to give the contents a little mix. After I applied the finish I was cleaning up and paid a little attention to the scrap and this finish really made the oak pop big time. The ray flecks in the piece almost looked 3D. I know I built this storage unit from cheap pine, but next time Im using a real quality wood, I will really consider using this again.
There was one more "experiment" I used on this project. I recently made one of my two to three times a year pilgrimages to Madison and the closest woodcraft store. This trip I only had one specific item I wanted to pick up (though I treated myself to one other thing, but youll hear more about that in the future.) A bottle of hide glue is what I had my yes on.
 Yes I know Titebond liquid hide glue is not traditional hide melted in a pot, but its a step in that direction and I have to say with all the dovetails in this project, the longer open time this glue offers was a welcome thing. I did all the gluing with this bottle and I have to say, in certain applications I am 100% sold. Dovetails and complicated glue ups, you betcha. In the future I will be using this for those applications for sure. I will still stick to my regular wood glue for more mundane things like edge glue ups and things like that. Very nice to add another thing to my arsenal of options.
 So here it is attached to the shop wall, where it will live for a good while. Kind of ironically the best location to hang it in the shop is across the room from the workbench. . . . right where the table saw lives.
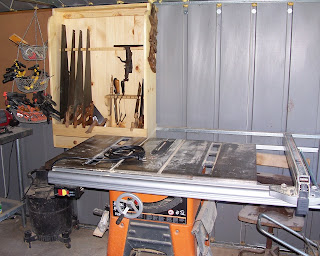 Hope these guys can get along together.
Cheers
Oldwolf
So here we go with my follow up on the project. Today I rubbed the finish into the drawer, put the whole thing together, took some pictures and hung it on the wall. If you havent seen the rest of this build you can find all the posts on the saw till build gathered under this link (CLICK HERE)
I experimented a bit with a new type of finish. This was actually the first time I did any mixing of finishes. Around the time I was starting this project I read an old article by Sam Maloof about shaping the arms of chairs. In it he also mentioned the three part finish he liked to use. So I started to do a little research into this specific finish and found several versions and recipes out there. I didnt follow one specific recipe from anyone I went to the store to find the most availible products that were in approximation to what Mr. Maloof mentioned. This is what I settled on.
There was one more "experiment" I used on this project. I recently made one of my two to three times a year pilgrimages to Madison and the closest woodcraft store. This trip I only had one specific item I wanted to pick up (though I treated myself to one other thing, but youll hear more about that in the future.) A bottle of hide glue is what I had my yes on.
Cheers
Oldwolf


0 komentar:
Posting Komentar